Well, this facelift was long over due. With the launch of Microsoft Azure some two years ago, the Amazon Web Services console looked dated over night. It still does to some extent. I haven’t had the time to dig deeper, but I will.
This war in prices, usability and features will make the future for services look really nice and shiny.
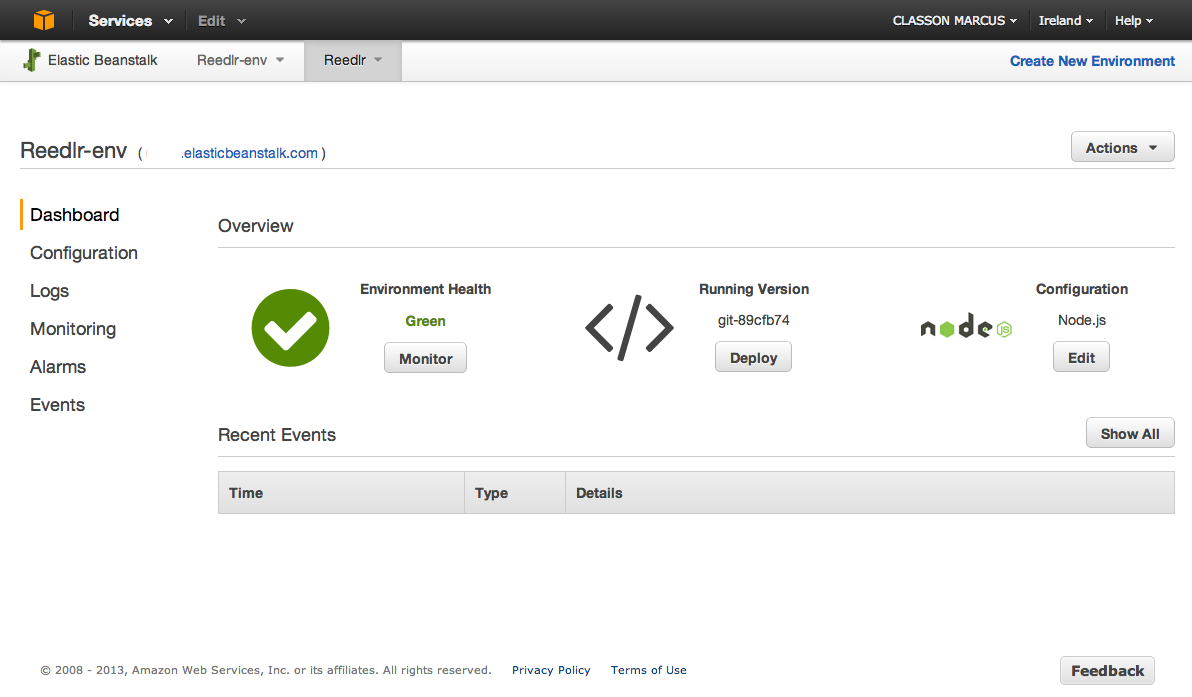
Here a look of the new console
I still think Azure looks more modern. But as I said, I’ll dig deeper. Perhaps brush up my Node.js project…
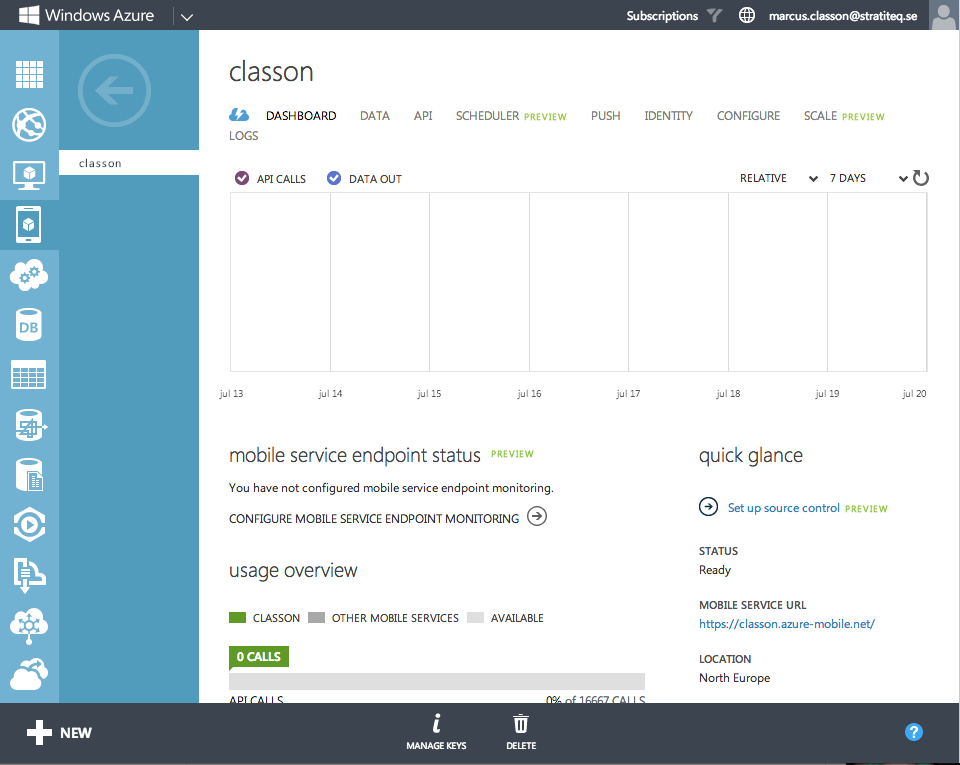
management console for azure
However, to get access to the underlying Elastic Compute Cloud (EC2) instances you still have to use the old, messy, interface at EC2.
So, Microsoft is ahead in the GUI category but AWS is waaay ahead when it comes to features.
This is something that often bites new developers. “There can be no memory leaks in a garbage collected runtime”. Well, perhaps not in theory, but in real life under the wrong circumstances there will.
Ok, not memory leaks in the terms original meaning, unreferenced memory, but memory you thought you got rid of but it hangs around never the less.
In my experience it mostly happens when we use either Events or Timers. The scenario for events is likely a view-driven application where we pop views in and out of existence. During the lifetime of the view it likely have to respond to events from the host window. Events like “the user clicked the save-button” or similar.
So, during initialization of the view it hooks up to the ev_Save-event in the host. Later, when the user switch view, you drop the reference to the old view and replace it with another one. Gone. Right?
No, the view you just disposed clings on for dear life to the event, and is not eligable for garbage collection.
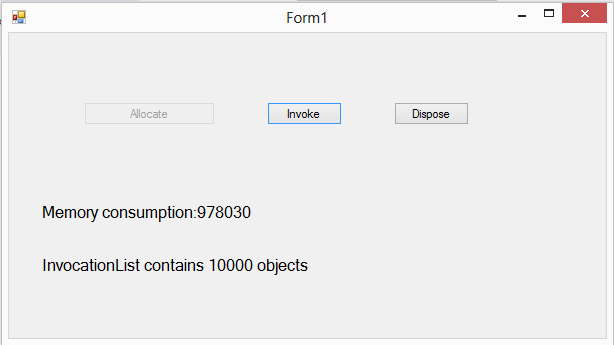
I have a class representing the view called Worker. I simulate adding 10000 views and then print out the memory consumption.
This file contains hidden or bidirectional Unicode text that may be interpreted or compiled differently than what appears below. To review, open the file in an editor that reveals hidden Unicode characters.
Learn more about bidirectional Unicode characters
Note that I’m not saving any references to it. Much like just adding it to the current view. I’m passing in a reference to the hosting window which the client uses to hook up all of the events for interacting with the user.
The constructor of the client “view” just hooks up the fake “save”-event. The heavy byte array is just to make the leak more visible in Task Manager.
This file contains hidden or bidirectional Unicode text that may be interpreted or compiled differently than what appears below. To review, open the file in an editor that reveals hidden Unicode characters.
Learn more about bidirectional Unicode characters
When I press the button invoking the “save”-event I can see that my array of listeners contains all the 10000 objects.
This file contains hidden or bidirectional Unicode text that may be interpreted or compiled differently than what appears below. To review, open the file in an editor that reveals hidden Unicode characters.
Learn more about bidirectional Unicode characters
Remember I didn’t keep any references to the clients. But rather, the client kept a reference to the host.
Look at this amazing piece of software 🙂
Anyway, to my surprice I hit 10000 save-events instead of the one on the screen.
The easiest way to mitigate this is to make sure the client unsubscribes to all events before you loose it. The perhaps cleanest way to do this is to implement the IDisposable interface and then, during the view-switching, invoke the Dispose()-method.
I simulate this in my handler for the “Dispose”-button
This file contains hidden or bidirectional Unicode text that may be interpreted or compiled differently than what appears below. To review, open the file in an editor that reveals hidden Unicode characters.
Learn more about bidirectional Unicode characters
A comment on calling GC.GetTotalMemory(true). When you pass true, the runtime will perform a full GC before returning the memory numbers.
Also, you will not get all that memory back. I.e. it will not drop to its original size. The application will keep the allocation, but regard it as usable. So when you click on allocate again after pressing Dispose, you won’t get an OutOfMemory exception. This is just the way .NET works
This scenario is, as I mentioned above, very common in Silverlight- and WinForm applications. Perhaps you are using MEF or Jounce or any other helper library that makes the tedious view plumbing go away. But it might also make you think that all this is automagically taken care of.
We have a couple of message in the queue. Let’s pull them out. This is the design of these objects we did in the previous post:
This is simulating a mobile application that can place orders of some kind.
To easily deserialize these into POCOs we create the container classes like this:
This file contains hidden or bidirectional Unicode text that may be interpreted or compiled differently than what appears below. To review, open the file in an editor that reveals hidden Unicode characters.
Learn more about bidirectional Unicode characters
Using the same names and structure as the JSON-objects will make the transition very easy for the built-in Javascript deserializer we are going to use.
So, first of all go to the Azure portal and get the connection string to the queue. Click on the link at the bottom saying connection information.
In the following popup you click the “copy to clipboard“-icon to the right of the “ACS Connection string” box. There, now you have the connection to the endpoint in your clipboard.
The connection string goes right where it says in the following snippet
This file contains hidden or bidirectional Unicode text that may be interpreted or compiled differently than what appears below. To review, open the file in an editor that reveals hidden Unicode characters.
Learn more about bidirectional Unicode characters
Here you get an instance of the NamespaceManager and then use it to check if the queue exists or, otherwise, create it. Orderqueue is the name we chose in the previous sample. Change to whatever your queue is called.
If everything is fine we go ahead and create the QueueClient pointing straight at our queue.
So, that’s all the setup needed.
Let’s go get some object then. Now, remember this example is overly simplified. It’s just blocking forever until a message arrives. It could very well that be you want some timeouts to act upon. The Client.Receive() optionally takes a TimeSpan for specifying the time to wait, just as in the MSMQ counterpart.
You perhaps also would like to check out the Async-methods and see if they better suit your needs. This sample is suitable for a Windows Service or any non-server application where you control the flow. I’m just using one thread for the loop so it’s fine.
This file contains hidden or bidirectional Unicode text that may be interpreted or compiled differently than what appears below. To review, open the file in an editor that reveals hidden Unicode characters.
Learn more about bidirectional Unicode characters
A few comments on the code. The BrokeredMessage contains a lot of metadata that you normally would like to extract. I’m just using the EnqueueTime as a sample. One interesting property is DeliveryCount. This is the number of time this message has been picked up for delivery but then just dropped (or at least not completed). SequenceNumber is another one. This can be used to check the ordering of the received messages if that is important in your application.
Ok. We have the message received alright. Since we didn’t go for the xml formatting but used JSON instead, we cannot use just a one-liner for the deserialization. Instead we take the body in the form of a Stream. Remember, the GetBody-method checks for the property “body” in the message
As you see on line 11 we add a property named “body” to hold the user request.
Now with the stream at hand, we wrap it in a StreamReader just so we don’t need to fiddle around with byte arrays but instead just use the nifty ReadToEnd to get the whole payload as a string. This string we then pass into the JavaScript serializer and tell it to deserialize our string to an Order instance. If all this went ok we send a signal to the queue that we are done with the message and it’s ok to delete it. This is done with Complete().
An excerpt from the documentation:
“Completes the receive operation of a message and indicates that the message should be marked as processed and deleted.”
And in our catch we just send it to the deadletter queue where all the garbage ends up. A bit crude but in this sample it is fine.
A few notes at the end:
In the Azure Portal you can set the default behaviour of the queuelike the DeliveryCount I mentioned.
But also, and this is a tip, the lock duration. When you pull the message out of the queue to process it, you have the amount of time specified here at your disposal. After that time has elapsed the message is unlocked and any message.Complete() after that will fail. The DeliveryCount will be increased on the message and it is ready to be retrieved again (by you or another application). I’m mentioning this because during debugging you will probably want to increase this to a very large number to avoid problem.
Another tip to make this work is that you will have to install the Azure SDK to get it to compile. Nowadays this is done preferably through NuGet.
Right-click on your project, select “Manage NuGet packages…” and search for “service”. There you will find the Azure Service Bus SDK. Click install and you are good to go.
Edit: I uploaded a sample project to GitHub here. End Edit.
This is really one of my pet peeves. The last five years of stolen user accounts really got the community on its feet and the internet is oozing of advice of how to do this. Most of them well intended but badly implemented. Many of the bad ones use good practices but put them all in a blender. Not all algorithms are meant to be mixed. My version I intend to keep clean and use mainstream encryption.
First what parts are we talking about?
Storing passwords
Using passwords
What good is a stored password if you cannot use it afterwards. This, however, doesn’t mean that you ever should be able to recreate (or decrypt) the original password. Always compare scrambled password to scrambled password. And yes, the downside is that the user never can ask to get his password sent thru email in case they forgot. There’s more to this than just number crunching the hash. How to set the cookie properly is one place where good intentions crumble…
Anyway, this is my take…
I won’t go into to much detail of all the inner workings of hashing algorithms and such. But two things is important, salting and stretching. Both of which is taken care of when using the standard algorithms i .NET.
Here is a the code that generates the salt and the salted password
This file contains hidden or bidirectional Unicode text that may be interpreted or compiled differently than what appears below. To review, open the file in an editor that reveals hidden Unicode characters.
Learn more about bidirectional Unicode characters
The key areas in this code is the use of RNGCryptoServiceProvider for generating the hash. Don’t create you own randomizer! And don’t ever use the same salt for all users and then hide it somewhere.
The main difference between a normal random number generator (RNG) and Cryptographically Secure Pseudo Random Number Generator (CSPRNG) – that’s a mouthful – lies in the predictability. Normal random numbers looks random but they really aren’t.
Ok, so now we have a salt. Next we are going to use Microsofts PBKDF2-implementation Rfc2898DeriveBytes to generate the key. The key in this case, is a hash that could be used as an parameter to other cryptographic stuff like the TripleDES encryption algorithm for encrypting a file.
It is worth noting that the key is not an encrypted version of the password.
A PBKDF (Password Based Key Derivation Function) is in it self a CSPRNG using the password and salt to create its Initialization Vector. After that you can use it to generate as many bytes as you like.
Sequential calls to GetBytes will not return the same bytes but the next bytes in the sequence.
This file contains hidden or bidirectional Unicode text that may be interpreted or compiled differently than what appears below. To review, open the file in an editor that reveals hidden Unicode characters.
Learn more about bidirectional Unicode characters
It is important to remember to also store the salt alongside with the password in your database. Why, you say, are you storing the salt? If the database get snatched the hacker also has the salt.
Yes correct, but first of all you need it when validating at login time and furthermore the salting makes it impossible to use rainbow tables.
The hacker has to calculate every possible password, salt it, hash it and then do the compare. Note that we also did stretching, we ran the hashing 10000 times.
When our user tries to log in again, we take his newly entered password and hash it using the same salt which we retrieved from the database.
This file contains hidden or bidirectional Unicode text that may be interpreted or compiled differently than what appears below. To review, open the file in an editor that reveals hidden Unicode characters.
Learn more about bidirectional Unicode characters
This file contains hidden or bidirectional Unicode text that may be interpreted or compiled differently than what appears below. To review, open the file in an editor that reveals hidden Unicode characters.
Learn more about bidirectional Unicode characters
Ok, so the user is now logged in to your system. The password is not stored anywhere and the hash is safe with you.
Somehow you have to remember during the length of the session that he or she is auhenticated. Normally you do this using browser cookies. Pretty easy to do, but if you just add it as a normal cookie it is susceptible to eavesdropping and hijacking of the session.
Three things to remember:
Always use https from the login screen and on. When the user clicks “login” you switch to https and stay there.
Set the authentication cookie to be Secure and HttpOnly to mitigate most of the threats like XSS. Secure means that it will only be sent when doing https calls. HttpOnly means the the cookie will only be used by the browser. Javascript cannot see it.
Do not use mixed content, i.e. you serve the html securely via https but some script och images get fetched through normal http. You will leak cookies! However, the steps above will normally stop this.
Windows Azure Mobile Services (WAMS) has been around for a while by now but the bandwagon has rolled out some significant improvements lately so it’s time to revisit. The perhaps most interesting (and enabling) change is the “Custom API”-feature. Until now, WAMS, was limited to acting as a CRUD-backend to your apps. Now, with Node.js as server language, we can develop “real” applications.
This is me spelunking with these features….
For completeness I’m starting from scratch
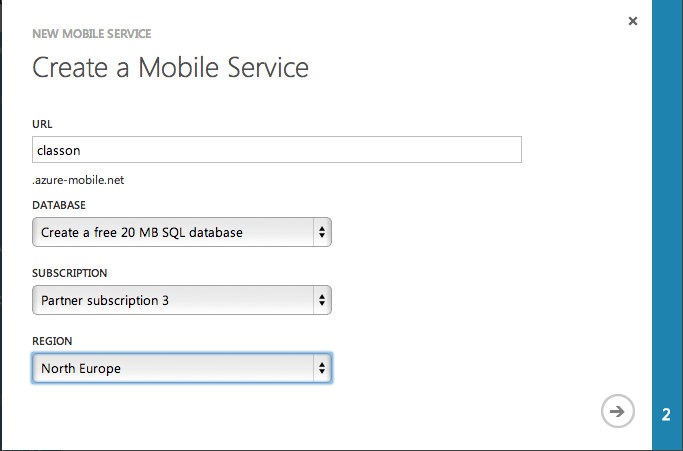
Create your WAMS application
Fill in the form. Sample below:
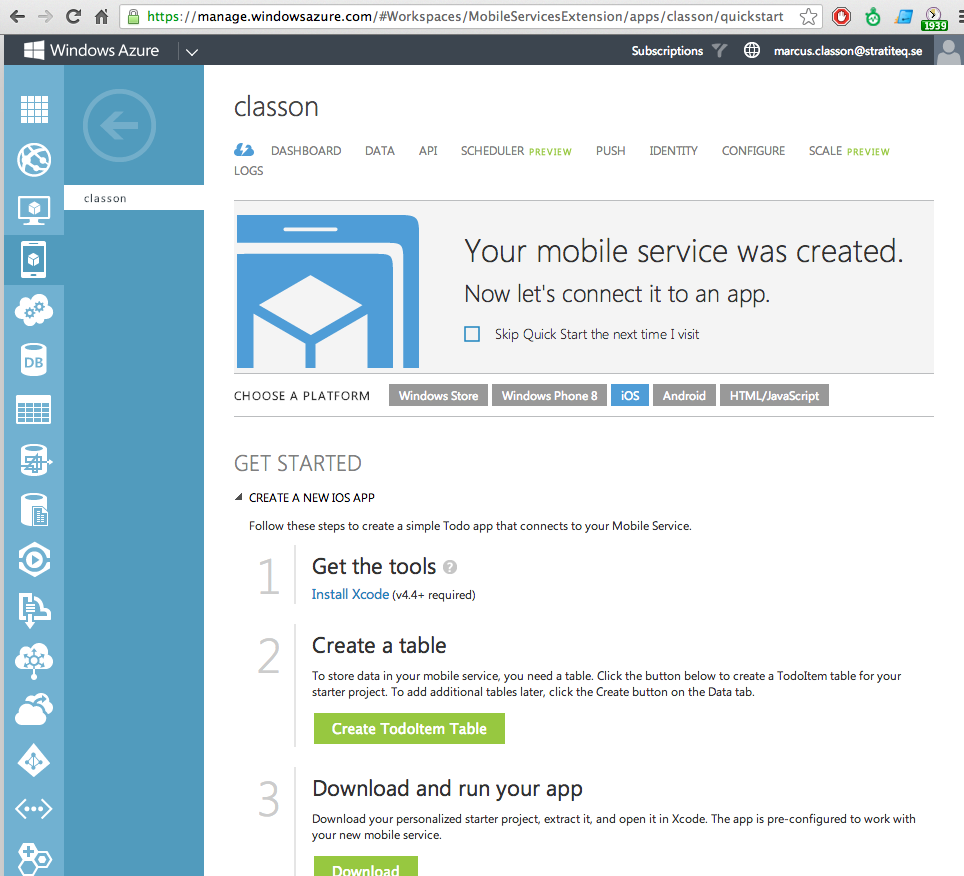
Now you should have an application created for you.
Now, the cool thing here is that Microsoft actually will create a boilerplate project for you with all the blanks filled in. Just select technology and download.
However, I will not use these boilerplates. I want to play around with the Custom API feature.
Create the Custom API
Just select API in the top menu and then click Create at the bottom. You should see this dialog now:
We will see the implications of the different permissions later on. Just leave them for now. After finishing this step the api is created and you are presented with the stub below
Testing the API
The simplest way to test the new API is through either Fiddler if you are on a Windows box, or with the cross platform Chrome-app Postman. Open a new tab in Chrome and click on “Web store” in the lower right corner. Search for “postman” and download.
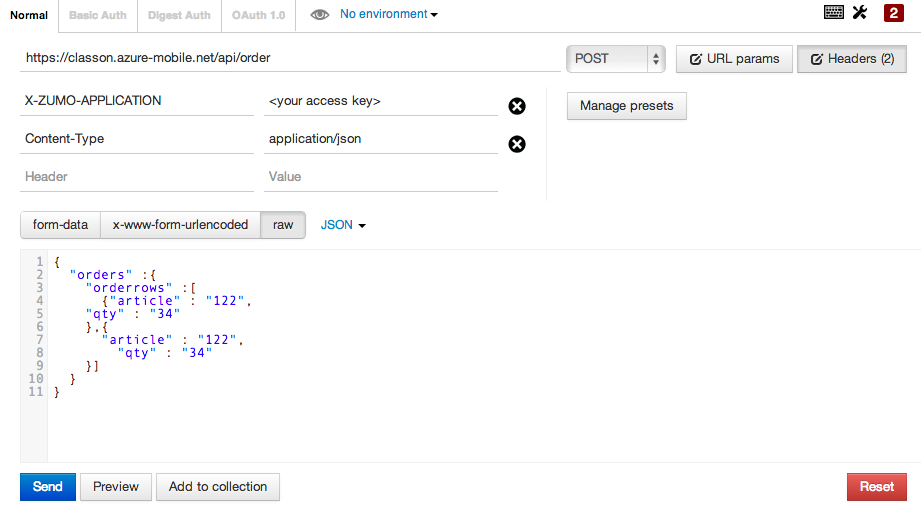
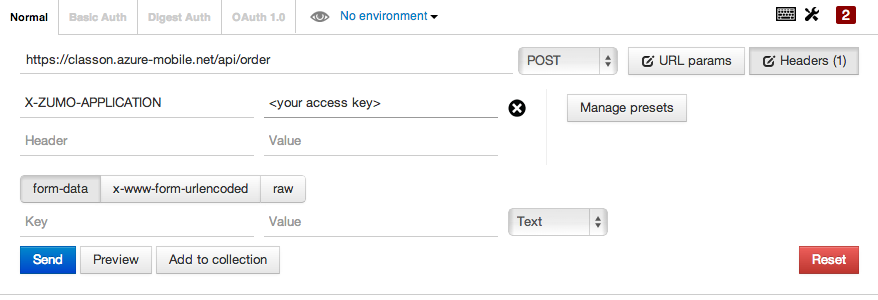
In postman you just type your URL for the api where it says “Enter request URL here” and change the verb from GET to POST.
So, I paste my URL https://classon.azure-mobile.net/api/order and change to POST and press Send.
And… I receive a 401 Unauthorized.
Why? Because as you remember from above the default permissions was “Anybody with the application key” and we didn’t provide one.
So, click on the Headers tab in Postman (top right). And enter X-ZUMO-APPLICATION as the name and paste in your application key as value. Now, when you Send you should get the 200 Hello World response.
Well then, what’s next?
To up the stakes a bit we’ll try to combine other Azure parts as well. Let’s combine this with the Service Bus….
Go to the Service Bus section of the azure management portal and click “Create”. Type in a name of your namespace as it is called. Give it a name and select the same region as you did with the Mobile Service. So, done.
To access this “bus” we need two things; the name and the access key. To get the key you click at the bottom where it says “Connection Information”. A dialog with a lot of connection stuff pops up. Press the copy-icon to the right of “Default key” to copy your key to the clipboard. Paste it somewhere where you can find it as we are going to be needing it when we continue to develop our api.
Connecting Mobile Services to Service Bus
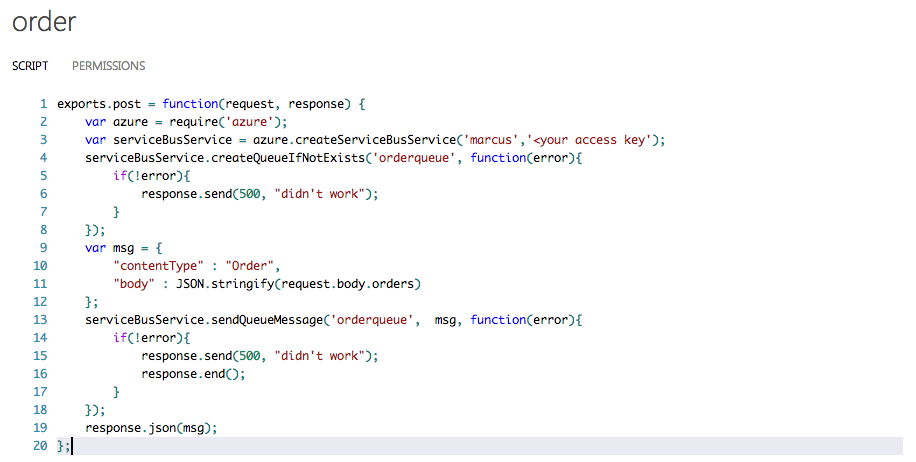
Now, modify the api-script like so:
What is happening here? Well, at line 2 we are using require to get an instance of the azure-sdk for Node.js. Line 3 is actually creating a reference to our Service Bus-namespace (in my case ‘marcus’). Here, as the second parameter, is where your key should go. The rest is kind of self explanatory. CreateQueueIfNotExist does just that. The first time it accessed the queue will be created. At line 9 I’m composing the message I’m going to send to our backend and the at 12 it flies away. A few caveats: the properties of the message are not arbitrary. The ‘body’-tag will be handled as the actual body of the BrokeredMessage. More about reading the message in C# in a later post.
Testing the api with a JSON workload
In our previous test we didn’t use any workload. Hence the lack of Content-Type in the headers. So, modify (in Postman) the request like so:
Edit: Updated payload to contain a collection of items. This way the receiving end will be cooler…
Press send and you receive something like this:
To see that the message didn’t just disappear but really ended up in the queue, go to the Service Bus section again and open your namespace.
You should now have a ‘orderqueue’ with a length other than 0
From here it is just to consume the queue from where ever you prefer.
 So, Microsoft is ahead in the GUI category but AWS is waaay ahead when it comes to features.